
Squirrels
David (who loves squirrels): Oh look, there's a squirrel! He's so cute!
Me: I don't like squirrels.
David: Oh, he's going to jump! Maybe if I scare him, he'll fall! (Knocks on window. Looks down. Pauses.) ...He may have fallen.

David (who loves squirrels): Oh look, there's a squirrel! He's so cute!
Me: I don't like squirrels.
David: Oh, he's going to jump! Maybe if I scare him, he'll fall! (Knocks on window. Looks down. Pauses.) ...He may have fallen.
Awww, peeps, I'm a NaBloPoMo failure, already! I missed posting yesterday--'completely spaced it with the slumber party. I guess it takes a bit of pressure off for the rest of the month, although I will still try to get in a daily post (or two; I think it was Mandy who once said that NaBloPoMo is 30 posts in 30 days, and a post a day was really more of a secondary thing). Anyway, here are those hats that I made. I think I'm going to crochet a flower and stick it onto the front of mine for sort of a flapper thing. My hat has a lot of holes, but the four-ply yarn makes it really heavy, so it's actually pretty warm (although I haven't tried it yet in serious winter weather; we're in the sixties this weekend!).
And as long as I'm uploading photos, let's talk about Friday's adventures in Thai food!
I first discovered that relatively easy and delicious pad thai could be made at home when we threw a surprise birthday party for Hathor this summer, with the theme of Thai Food Extravaganza.  Green curry, spring rolls with peanut sauce, and meng khum were also on the menu, but the pad thai was really to be the highlight (I hoped). David had a wok, so we decided to give it a go!
This recipe from Chez Pim was the awesome. It's a little long, but very entertainingly written as well as highly informative. I hadn't actually reread it since we did the party, and reading it again just now I realized the things I'd done wrong or forgotten. Still, I thought it turned out beautifully on Friday, and will probably be different for tonight's mini-party, but hopefully equally delicious.
Here's my take on the recipe (but, seriously, read hers first if you are thinking about making it. You won't be disappointed).
Sauce: 1/4 cup tamarind concentrate
1/4 cup Bragg liquid aminos (I used Bragg's for Heather's, and then soy sauce later, and have decided I much prefer Bragg's!)
~1 tablespoon Sriracha chili sauce
~1/3 cup brown sugar (I'd forgotten this the past couple of times I'd made this, and completely hadn't noticed! I'd suggest starting low and working up)
Simmer it all for a while and adjust to taste (Pim has a great discussion on the flavor balance)
Noodles:
I have no idea whether or not this is proper, but I bring a pot of lightly salted water to a boil, throw my noodles in, give them a stir, and let them soak until they're quite al dente. Then I drain them and return them to the pot, although they did kind of stick together last time.
Prep: -Tofu (I cut a block into thin, bite-sized pieces and sauteed them in a hot skillet with Pam and little curry powder and seasoned salt. She suggests doing this in the wok, but I liked the ease of having them ready to go)
-Garlic (several cloves, roughly minced. Pim says this is optional; I can't really imagine doing without)
-Carrots (shredded in the food processor, although they'd probably be a little nicer julienned)
-Green onions (sliced diagonally into ~1" pieces)
-Bean sprouts ('totally forgot these last time)
-Red cabbage (optional)
-Lime wedges
-Dry roasted peanuts, roughly chopped
-Cilantro, roughly chopped
Wok!
Get the wok "smoking hot" and add a splash of oil. I would definitely suggest having an accomplice for the wokking; I generally run the stirring and David throws ingredients in (which is why we lack photos--sorry!).  Last time, we did the vegetables first, then the noodles with the sauce, then the garlic, and then two eggs, cracked and scrambled right in the wok (which sounds so much easier than it actually is--sigh). Keep everything moving around as you're cooking, and remember, as I did not last time, to keep the amounts small and well-timed, so that the wok stays smokin'. When hot, fragrant, and delicious-looking, transfer onto a plate and garnish with peanuts, cilantro, and a squeeze of lime juice.
Guys, this is so delicious. We just had it on Friday, and already I'm salivating in anticipation of eating it again tonight.
Oh, and hey, since I'm on a roll, here is how I do Thai iced tea:
Place ~8 tablespoons of Thai iced tea into French press; add approximately two cups boiling water and let steep for a minute or two before pressing. You could chill the tea at this point, which would be a great idea. In the past, I've just poured it into two glasses filled with ice (ice which quickly melts down to nearly nothing!). Stir in maybe three tablespoons of sweetened condensed milk. I've read that you can use sugar and half and half; I haven't tried that. I have tried thinning the sweetened condensed milk in an attempt to achieve that beautiful layered effect, but haven't been successful. Maybe if I chilled the tea first? Let me know if you have a special trick.
Tonight, I made hats! I haven't taken pictures of them, yet, but I think they're pretty cool. One I had already started, and the second went really fast because I was using four-ply yarn and my new giant (size Q) crochet hook.
I also made bang-up pad thai, which is quite a lot easier than you might expect. I did take some pictures of that (though I haven't uploaded them), so you may be treated to a step-by-step later.
Last week I finally (after three years of thinking about it) spray-painted the feet of my clawfoot tub silver. I do have a picture of that, so here it is:
In the process I managed to point the can the wrong direction and spray my finger, of which I also, naturally, have a picture:
The silver spray paint was from another DIY project I never posted, a jewelry holder I made several weeks ago and which is currently hanging in my bathroom. It occurs to me that I should probably post about that.
David also used the silver spray paint to modify his Halloween pitchfork, which started out red and was thus even more ridiculous than it is in the picture. He was disappointed that I didn't post his carefully cropped version of our American Gothic picture, so here it is:
Tomorrow I'm going to a slumber party at a friend's house! I'm really excited about that. I hosted a slumber party at my parents' house a couple of summers ago (did I really not post about that--?), but I haven't been to one at someone else's place in ages. Drew Barrymore, apparently, said, "The older you get, the fewer slumber parties there are, and I hate that. I liked slumber parties. What happened to them?" Well, we're bringing them back.
So, it's Day Five of NaBloPoMo, and I'm already sort of running out of ideas. Yesterday was a halfway-freebie, too, because I had started that post weeks ago and had just never finished it. Anyway, here are a few snippets:
This lamp at Design Within Reach is beautiful. It is made from fiberglass,  and it is $980.
I made mine, albeit somewhat smaller, and of humbler materials, for about a hundredth of that. Here's how, with nods to these helpful tutorials.
Supplies:
1 17" balloon, inflated at store
1 150 yard skein of hemp yarn
1 bottle Elmer's glue
1 cord set (mine was Hemma, from Ikea)
1 metal hanger
White paint (optional)
Step 1: Prepare working surface. I cut open a plastic bag for a drop cloth, and wore grubby clothes. This gets really messy! Draw a circle around the tied end of the balloon; I used a Sharpie and a margarine lid for mine.
Step 2:  Pour the glue into a small container and water it down a bit, maybe to the consistency of thickish syrup. You want to be able to coat the string easily, but ideally not have it dripping everywhere. David, my amazing assistant, helped untangle and feed me the string.
Step 3: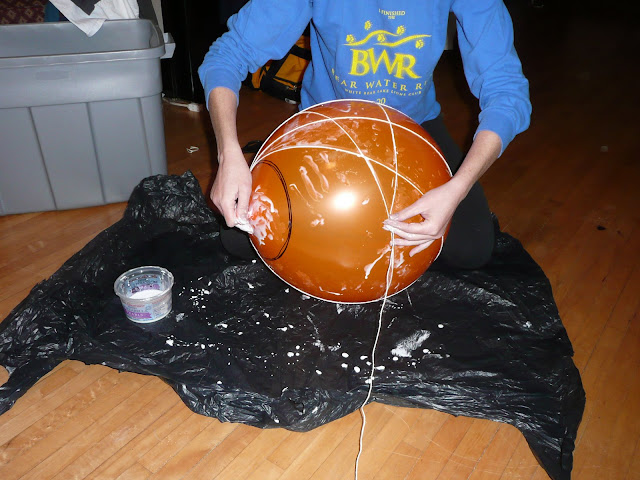 Apply glue to the string and begin wrapping the balloon. What worked best for me was to get my hand gluey and then pull the string through it as I applied it to the balloon. I think a handful of glue would last me maybe three feet, but this would depend on the consistency of your glue, thickness of your string, and, presumably, the size of your hands.
 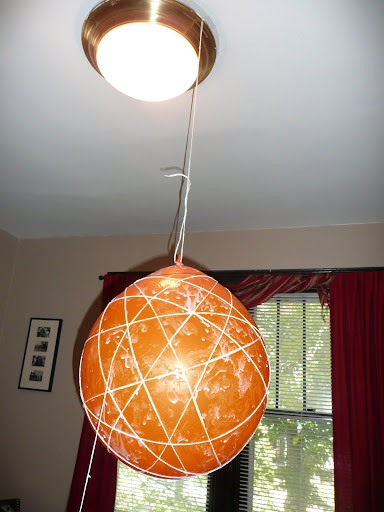 Apply string around the borders of the circle you've drawn, but not through it, and aim for a nice, random, all-over application of the string.
 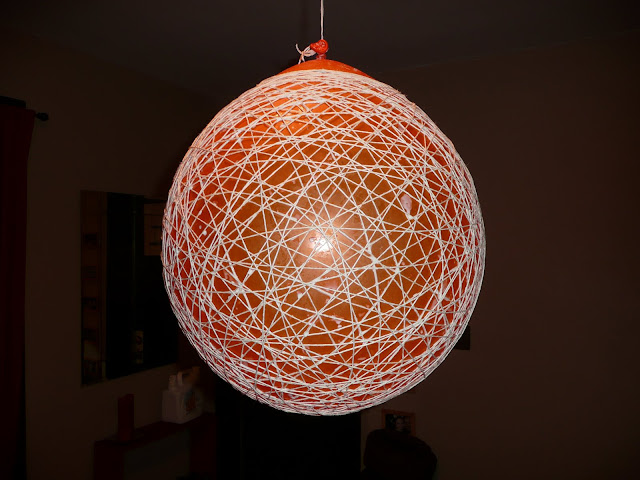 After the first 10 or 12 loops, I felt like my string was sliding around, so I let everything dry before continuing. It seemed to make applying the next layers easier, as everything felt more stable.
Step 4:
When you've applied the desired amount of string and let everything dry, deflate the balloon, ideally as slowly as possible. 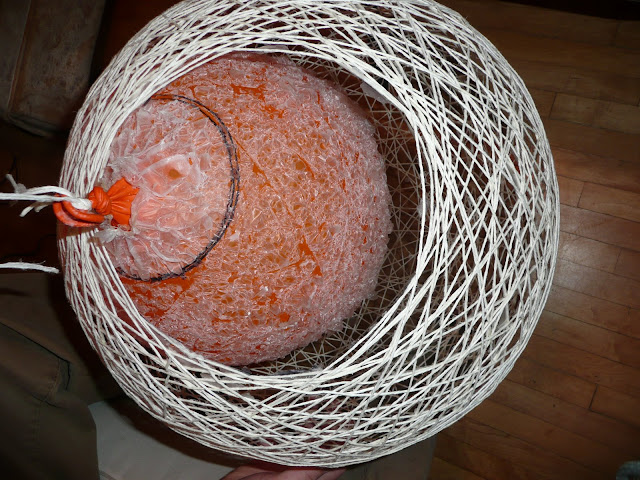 I sort of pulled the neck tight and made a small incision that I could control. In some places the string stuck to the balloon, and I poked it free without trauma. Pull the deflated (and possibly awesome-looking) balloon free and admire your incredible handiwork!
Step 5: Attach the cord set (which I painted white, for looks) and light bulb (I used the biggest frosted globe I could find) to the shade. I cut a piece of wire hanger to slightly longer than the width of the opening, inserted it into holes formed by the string, bent up the ends for stability, then used a wire twist-tie to secure the cord to the center of the hanger crossbar. Oh! To straighten the kinks out of the cord, I dipped each section briefly in boiling water and then used a towel to very gently pull it straight.
Ta-da! The DWR lamp doesn't include a light bulb, so even though  I bought rather expensive hemp yarn, I figure I still saved at least $960. I found some great string at Savers, probably enough to make three or four lamps, for only $3, so I think I'll try another lamp for the living room!
UPDATE: Check out the much smaller versions we made for Christmas ornaments!